 2. Create your first application
Overview
In Polybench Data Manager, log in as administrator (default password 1234). A toolbar appears, containing a button called Polybench Designer. Click on that button to open Polybench Designer.Details
Open Polybench Designer
Polybench will start as a new program. During start-up it will load all installed libraries and then show its Start Screen.Note: Multiple instances of Polybench can run at the same time.
From the Start Screen or the Help menu on top of the window, you can open Help information and check for updates. Help documentation is installed on your system locally. Polybench Designer provides context sensitive help as much as possible, but you can open the help program separately as well. The help program offers an extended keyword index and a search function. If you want to check if any updates for Polybench are available, then an internet connection is required.
Create a new project
Click New Project on the Start Screen of Polybench. A large, white screen opens up.This large white area is the Design page. Click your mouse on it and drag it down and to the right. You will see that it has a border, behind which the surface has a dark green color. The white area is called a Page. The Designer page that opens initially is a very large page, to offer you enough space to draw signal analysis schematics on.
You can move a page by dragging the page surface with your mouse. You can zoom in and out by scrolling your mouse wheel, or pressing the plus and minus zoom buttons on the right-bottom of the window.
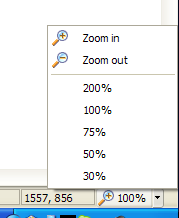
The zoom menu at the bottom of the screen. Click on the percentage value to quickly switch between 100%, 75% or 50%. Or click the arrow to open the zoom menu. You may also press Ctrl-plus or Ctrl-minus on your main keyboard.
Move your mouse to the left border of the screen.
A dialog pops up. It is the Toolbox. Here you can find all mathematical operators and user interface components to build your application with.
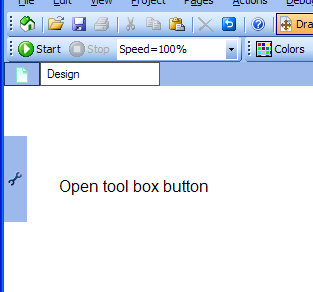
The blue area to the left opens the tool box if it is hit by the mouse cursor. In the designer menu you may change that behavior so that the tool box opens only if you click the blue area. You may also press F9. You can move the blue area up and down, just what is most convenient for you.
Make a simple application
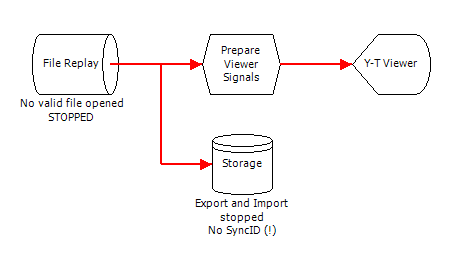
Drag the following operators from the Toolbox to the Page:Replay (from 'In Out')
Prepare Viewer Signals (from 'Viewers', the one with the +)
Y-T Viewer (from 'Viewers'). A symbol and a viewer window appear.
Storage (from 'In Out')
If you move your mouse over the symbols, you will see they have ports (indicated by small triangles). You can connect an input and output by dragging the mouse from one port to the other. Polybench will automatically route the arrow.
If you move your mouse over the viewer window, you will see it gets blue borders. You can drag the viewer or re-size it, using these borders.
Connect the symbols like is drawn below.
Click once on one of the symbols to open the Properties Dialog. In this dialog, you can set all properties of the selected operator or element. Click on the other symbols, to see what you can change to their settings. Click on the blue border of the viewer, to see its settings. The viewer properties are the same as the properties of the Y-T Viewer symbol, because those two belong to each other.
Note: you may click Close to close the properties dialog, but you can also just click on the page to close it, or click on another operator to view its properties.
Open the properties of the Replay operator. Click on AbsolutePath to select a replay file. Search for the demo file 'PolybenchSample.Polygraphy.Poly5' (or another demo file) in the 'Help/Examples' folder in your installation folder (look in the Windows Program Files folder). Select it and close the dialog. The red arrows in the schematic have now become black.
Note: a red arrow means: no signal channels found. A bold, black arrow means: two or more signal channels are available. A thin black arrow means: only one signal channel available. Read more about connection rules here: "Connectors and connection rules".
Now click the Start button on top of the screen. Signals start to run in the viewer. You will see that the signals do not properly fit in the viewer. The signal ranges have to be adjusted.
Click on the Prepare Viewer Signals operator. The properties dialog shows several tabs with properties you can change. Select Ranges and Offsets. A list of all channels is displayed. Select the channels you want to change (their background becomes gray), and type a range value in one of the selected channels under Range. Press enter and see that the signals immediately change. Adjust until they are in range.
Create a view page
Press the Page symbol on the Page bar just above the drawing area (or press Ctrl-Insert). The Page Dialog appears. Select a page size that fits on your computer screen (e.g. 1280 x 1024). A new page is created.
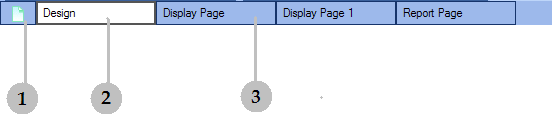
The Page Bar. (1) is the Add Page button. (2) is a page button of the page you are currently seeing. (3) is a page button of another page. Click on it to show the page.
After adding the page, on top of the Polybench window you will see the two pages on the Page Bar. Click on the caption of the new page to show it. Click right on the page and choose Properties. In the Page-properties dialog, you see that you can change the page's background color, or even put an image as background.
Here you can also change the name of the page, in the Caption property.
Click in the Page Bar on Design. You return to the design page. Click right on the blue border of the viewer. Select Move to Page and choose the name of the other page. The viewer window will then move to the new page.
Re-size the viewer window, so that it fills a large part of the screen of the new page. Then press the Full Screen button on top of the Polybench window (or press F5). You will now see the page full screen.
To exit the full screen mode, move your mouse to the upper right corner. An x button will appear, to close the full screen window. You can also press Alt-F4 or Esc to exit full screen mode.
Save your project from the File menu. Save wherever you like the project to be saved. The file gets the .XMC extension. Then close Polybench.
Add the project to the Application Start panel
In the Data Manager, log in as administrator (default 1234) and press the Applications button. Press Add Application. Choose your new project. It will be added to the list. If you close the dialog, a button for your project is added to the right panel of Polybench Manager.If you click on the new application button, Polybench will start and your application will load.
You can also specify that your application should load in full screen. In the Application Start Buttons dialog you should then choose Start as End-user.