 Application Start Buttons
Overview
The Polybench application that are listed in this dialog, are visible as buttons on the main screen. This allows the users to quickly start an application, just by clicking a button.Please note: for applications that record data from a device, the "Post-process" option should not be checked, otherwise the button will grey out if there are not yet any measurements.
User Interface
Specify applications for quick-start buttons
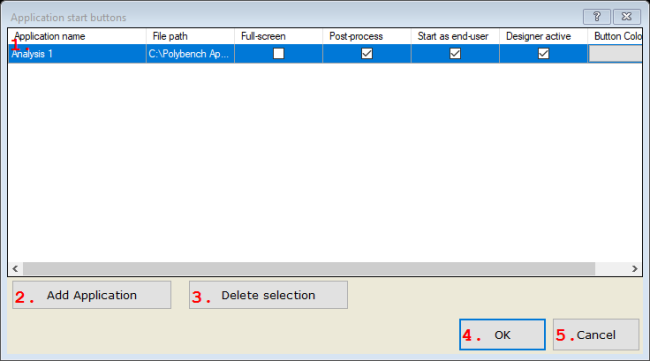
1. Table
Lists the apps that are visible as buttons on the main screen. You can find details about settings per app below.Application name
The name of the application as displayed on the application start button.
If you click on a cell in this column, you can edit its value.
File path
Path to the application file. The path is set automatically, after adding the application to the list.
Full-screen
Check if the application should start full-screen. Uncheck to start in a window.
If you click on a cell in this column, you can edit its value.
Post-process
Check if the application processes data that have been recorded before. This forces the user to select a measurement.
If you click on a cell in this column, you can edit its value.
Start as end-user
Start this application so that an end-user immediately can start working with it (this is how the application would normally start).
If you click on a cell in this column, you can edit its value.
Designer active
Check if the designer should be active in the background. In that case, if you press Escape in the application window, the designer is made visible.
If you click on a cell in this column, you can edit its value.
Button Color
Press the button to select an alternative color for application button.
If you click on a cell in this column, you can edit its value.
2. Add Application
Opens a file-open dialog in which you can search and specify the Polybench applications you would like to add to the table.3. Delete selection
Delete the selected entries in the table. Before deleting anything, you are asked to confirm if you really want to delete.4. OK
Accept the changes and closes the dialog.5. Cancel
Rejects the changes and closes the dialog.
Details
In the table, a number of options can be selected for each application. Not every combination of options is allowed. If you do not or cannot select a designer to be active, then your application must 'start as end-user'.Post-Process
If selected, the application is specified to be a post-process. Post-process applications do analysis on previously recorded measurements. If this option is selected, it is tested if a measurement has been selected by the end-user, before the application is started. If no measurement or patient has been selected, the application start button will be disabled.Arguments
The application may be started with optional arguments. Which arguments are used by an application should be documented for that application. An argument should look like this: /ArgumentName:"ArgumentValue". If ArgumentValue does not contain spaces, the quotation marks may also be omitted. ArgumentName cannot contain spaces and is case sensitive.Example: /defaultfilename:"raw meas" /showadmin:yes.
You may use a few variables in the arguments. The following arguments are valid:
/SomeArgument:"$selectedfile$": If the application uses SomeArgument (in the form of the variable $SomeArgument$), then this is filled with the full path of the recording file that is currently selected in the Data Manager.
/language:"$selectedlanguage$": The application is started with the same user language the Data Manager is currently running. If that language does not exist for the application, the application will run in its default language.